
Microwaves are a staple in many kitchens, but the process of venting them can be confusing. Especially when it comes to interior walls, the process may seem daunting. However, with the right tools and techniques, venting a microwave on an interior wall can be a smooth and successful project.
In this guide, we will take you through the step-by-step process of how to vent a microwave on an interior wall. From understanding the types of microwave venting options available to the tools and materials needed, we will cover everything you need to know to get your microwave properly vented and ready for use. So, let’s get started!
-
- Choose a vent system – There are two types of vent systems, ducted and ductless.
-
- Choose a location – Pick a spot on the wall that’s close to an external wall.
-
- Install the vent – Cut a hole in the wall and install the vent system.
- Connect the vent to the microwave – Run the vent piping to the back of the microwave and connect it.
How to Vent a Microwave on an Interior Wall?
Determine the Right Location for Venting
Venting a microwave on an interior wall requires careful consideration of the location. Start by identifying the wall where you want to install the microwave. Look for a spot that is near the electrical and plumbing lines and can accommodate the vent ductwork. Consider the proximity of the vent to the outside of the house, as well as the direction of the vent. Make sure that the vent does not interfere with any structural or safety features of the house.
Once you have identified the location, mark it with a pencil. Use a stud finder to locate the studs in the wall and mark them as well. This will help you to determine the best location for the vent.
Choose the Right Type of Vent
The type of vent you choose will depend on your specific needs and the layout of your home. There are several types of vents available, including ducted and ductless vents. Ducted vents require a duct to be installed through the wall or ceiling, while ductless vents use a filter to clean the air before it is released back into the room.
Consider the size of the microwave and the amount of air it will need to vent when choosing the type of vent. Ducted vents are typically more efficient and effective at removing smoke and odor, but they require more installation work.
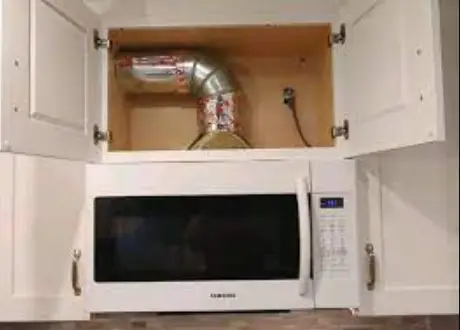
Install the Vent Ductwork
If you have chosen a ducted vent, you will need to install the vent ductwork. This involves cutting a hole in the wall for the duct and connecting it to the vent hood on the microwave. Make sure that the ductwork is properly insulated to prevent condensation and moisture buildup.
Use a drill to make a hole in the wall for the vent duct. Measure the distance between the microwave and the vent hood to determine the length of the ductwork. Cut the duct to the appropriate length and attach it to the microwave and the vent hood.
Install the Vent Hood
The vent hood is the part of the vent that sits above the microwave and collects the smoke and odor. Install the vent hood by attaching it to the wall and connecting it to the vent ductwork.
Use a level to make sure that the vent hood is straight and secure. Screw it into place using the provided screws. Connect the vent ductwork to the hood using foil tape or duct clamps.
Install the Microwave
Once the vent is installed, you can install the microwave. Follow the manufacturer’s instructions for installation, making sure to secure it to the wall and connect it to the electrical and plumbing lines.
Test the microwave to make sure that it is working properly and that the vent is functioning as intended. Check for any leaks or damage to the vent ductwork or hood.
Benefits of Venting a Microwave on an Interior Wall
There are several benefits to venting a microwave on an interior wall. It can help to remove smoke and odor from the kitchen, improving air quality and reducing the risk of fire. It can also help to keep the kitchen cooler by removing excess heat from cooking.
Additionally, venting a microwave on an interior wall can help to save space in the kitchen by eliminating the need for a freestanding vent hood.
Ducted vs. Ductless Vents
When deciding between a ducted and ductless vent, there are several factors to consider. Ducted vents are typically more efficient at removing smoke and odor, but they require more installation work and may be more expensive. Ductless vents are easier to install and require less maintenance, but they may not be as effective at removing smoke and odor.
Consider your specific needs and the layout of your home when deciding between a ducted and ductless vent.
Common Mistakes to Avoid
When venting a microwave on an interior wall, there are several common mistakes to avoid. One is installing the vent too close to the ceiling, which can cause the smoke and odor to linger in the kitchen. Another is using the wrong type of vent, which can lead to inefficient or ineffective ventilation.
Make sure to follow the manufacturer’s instructions for installation and use the appropriate materials and tools.
Maintenance and Cleaning
To keep your vented microwave functioning properly, it is important to perform regular maintenance and cleaning. This includes cleaning the vent hood and filter, checking the ductwork for leaks or damage, and replacing the filter as needed.
Make sure to follow the manufacturer’s instructions for maintenance and cleaning, and schedule regular inspections by a professional if necessary.
Conclusion
Venting a microwave on an interior wall can improve air quality, reduce the risk of fire, and save space in the kitchen. By choosing the right location, type of vent, and installation method, you can ensure that your vented microwave functions properly and efficiently. Remember to perform regular maintenance and cleaning to keep your vented microwave in top condition.
Frequently Asked Questions
What is a microwave vent?
A microwave vent is a feature that helps to remove excess heat, steam, and smoke generated during cooking from the microwave’s interior to the outside. It helps to keep the kitchen environment free from unpleasant odors, moisture, and grease buildup. Proper venting also extends the lifespan of your microwave by preventing damage from excessive heat buildup.
The vent may be located on the top, back, or in front of the microwave, depending on the model. It can be either an external vent that connects to a duct leading outside or a recirculating vent that filters the air before releasing it back into the kitchen.
What are the benefits of venting a microwave on an interior wall?
Venting a microwave on an interior wall has several benefits. Firstly, it saves space in the kitchen, as the microwave can be installed above the stove without taking up valuable counter space. Secondly, it helps to improve the aesthetic appeal of the kitchen by reducing clutter and creating a streamlined look. Thirdly, it improves the efficiency of the venting system by reducing the distance between the vent and the outside.
Since interior wall venting requires drilling a hole through the wall, it is important to hire a professional to ensure that the job is done correctly and safely.
What are the steps to vent a microwave on an interior wall?
Venting a microwave on an interior wall involves several steps. Firstly, you need to determine the location of the vent and drill a hole through the wall. Secondly, you need to install the vent duct and connect it to the microwave. Thirdly, you need to seal any gaps around the vent to prevent air leaks. Finally, you need to test the vent to ensure that it is working properly.
It is important to follow the manufacturer’s instructions carefully when installing the vent, as failure to do so can result in damage to the microwave or even pose a fire hazard.
Can you vent a microwave into an attic?
No, it is not recommended to vent a microwave into an attic. This is because attics are not designed to handle the high levels of heat, moisture, and grease that are generated during cooking. Venting a microwave into an attic can lead to mold growth, wood rot, and even pose a fire hazard.
Instead, it is recommended to vent the microwave to the outside, either through a wall or roof vent. This ensures that the excess heat and moisture are properly removed from the kitchen, and prevents damage to your home’s structure.
What are the common problems with microwave vents?
The common problems with microwave vents include clogging, improper installation, and damage to the vent duct. Clogging can occur due to the buildup of grease, dirt, and debris over time, which can reduce the efficiency of the vent and even pose a fire hazard.
Improper installation can lead to air leaks, which can reduce the effectiveness of the vent and allow moisture and heat to escape into the kitchen. Damage to the vent duct can also occur due to wear and tear or improper installation, which can lead to air leaks and reduce the efficiency of the vent.
Regular maintenance and cleaning of the vent can help to prevent these problems and extend the lifespan of your microwave. It is also important to hire a professional to install the vent to ensure that it is done correctly and safely.
In conclusion, venting a microwave on an interior wall may seem like a daunting task, but it is definitely doable. Remember to choose the right type of vent and ensure that the microwave is installed at the correct height and distance from the wall.
Additionally, make sure to follow the manufacturer’s instructions and local building codes to ensure safety and proper installation.
By following these simple steps, you can easily vent your microwave on an interior wall and enjoy a more efficient and functional kitchen. Don’t be afraid to ask for help or consult with a professional if necessary. Happy venting!